Davinci Resolve - How to Import Surround Sound Mix and Export Surround File
If you only have a self contained video file and DON'T have an existing timeline use this wiki below
Davinci Resolve - Surround Sound Audio Import and Export
Open your Resolve project and load up the final project timeline |
|
| Bring the Surround Sound File into the Media Pool |
|
| Load the timeline to add the surround sound mix audio |
|
Right click to >Add Track >5.1>5.1 (not Film) |
|
Edit your surround sound file on to the track |
|
Solo the Surround sound track with the mix and check sync to make sure that all the tracks are in sync |
|
| Click on the Firelight Tab |
|
Indeed the track is surround sound when you look at the track should see 6 channels in playback |
|
Next go to >Fairlight>Bus Format |  |
Bus 1 Choose Format 5.1 Click on OK |
|
Ready to export >Click on the Deliver Tab |
|
In the upper left corner click on Render Settings Choose >ProRes 422 HQ |
|
Make Sure Single Clip is selected and Title the Filenmae and choose a location to save the file |
|
Click Browse to navigate to the folder you want to save the QuickTime |
|
Pick a Storage Drive and folder to save the file Click OK |
|
Make sure the Export Video is checked Or what ProRes Codec you'd rather use for lower or higher quality |
|
Or if you would like to export a UHD 3840 x 2160 version choose that setting FPS 23.976 (or 24 or whatever frame rate your timeline is) |
|
Choose Advanced Settings Make sure Retain Sub-black and Super White Data is checked |
|
Click on Audio tab |
|
Codec AAC Constant Bit Rate Track Data Rate 320 Set Output Track 1 Bus 1 (5.1) |
|
Last Add to Render Queue and render
|
|
Once the file renders open in Quicktime and choose >Window>Show Movie Inspector
|
Should see audio settings as surround 5.1 (C, L, R, Ls, Rs, LFE) |
Finally, if you are trying to playout via VLC OR ARE ADDING CAPTIONS you will need to change the timeline Start Timecode setting to start playback at 0 hour. | |
Go to DaVinci Resolve locate the sequence you want to change in the Bin |
|
Right click it and >Timelines>Starting Timecode |
|
Set TimeCode to 00:00:00:00 |
|
Choose to Start Render to create the QuickTIme |
|
Once the file renders open in Quicktime and choose >Window>Show Movie Inspector
|
Should see audio settings as surround 5.1 (C, L, R, Ls, Rs, LFE) |
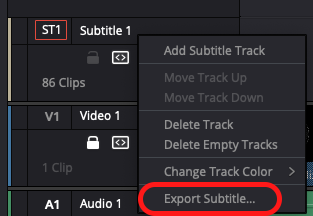
Back in your timeline... To export the generated subtitles as a .srt file, navigate to the subtitle track and right click Click on Export Subtitle... |
|
This menu should be called up Name your file and make sure you're saving it to the right destination Click Save |
|


Welcome to the University Wiki Service! Please use your IID (yourEID@eid.utexas.edu) when prompted for your email address during login or click here to enter your EID. If you are experiencing any issues loading content on pages, please try these steps to clear your browser cache.